
Medical Billing Checklist: 12 Steps to Faster Payment
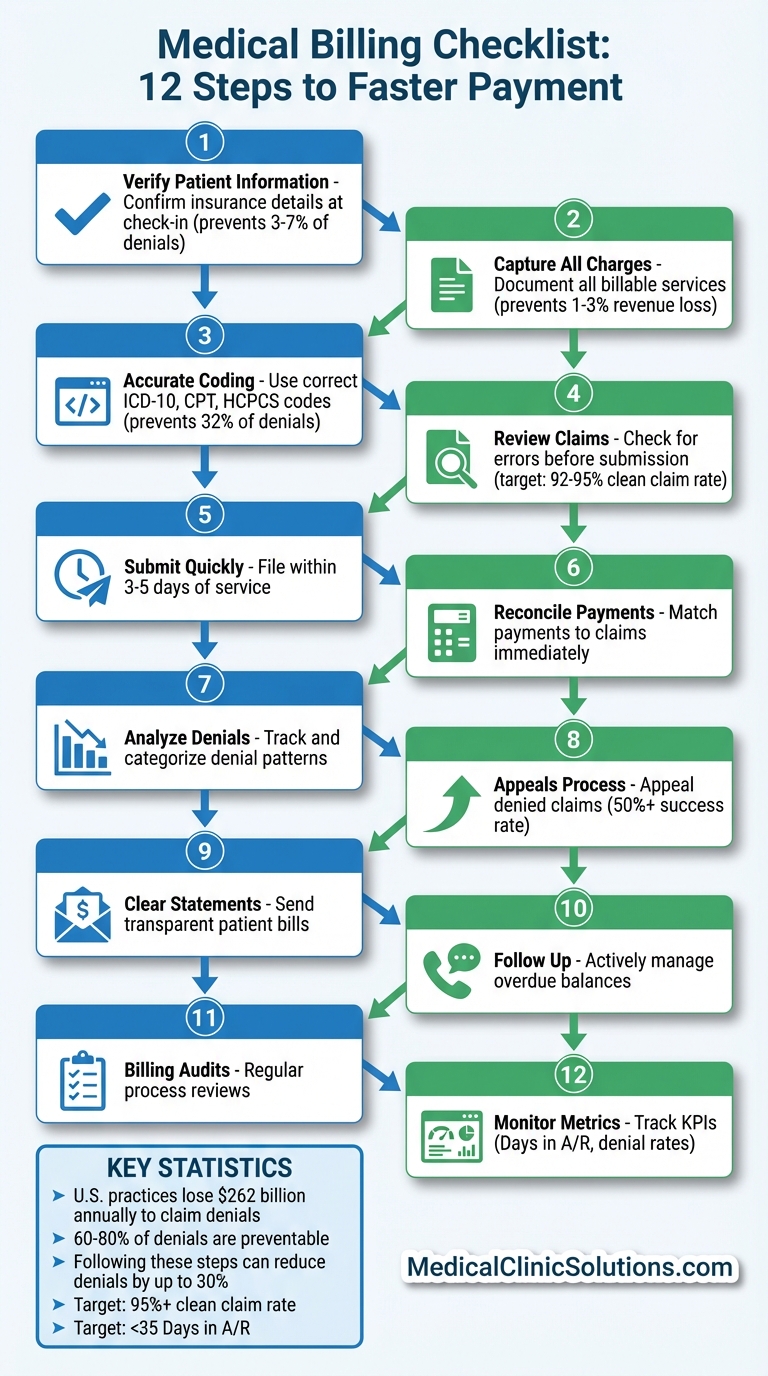
Want to get paid faster for medical services? This 12-step checklist eliminates common billing errors, reduces claim denials, and improves cash flow. Here’s what you need to know:
- Verify Patient Info: Confirm insurance details at check-in to avoid eligibility-related claim rejections.
- Capture All Charges: Ensure all billable services and supplies are documented and billed.
- Accurate Coding: Use correct ICD-10, CPT, and HCPCS codes to prevent denials due to coding errors.
- Thorough Claim Reviews: Check for errors before submitting to maintain a 92%-95% clean claim rate.
- Submit Quickly: File claims within 3-5 days of service to meet payer deadlines and speed up payments.
- Reconcile Payments: Match payments to claims and address underpayments or discrepancies immediately.
- Analyze Denials: Track and categorize denials to fix recurring issues and recover lost revenue.
- Appeals Process: Appeal denied claims systematically; over 50% of appeals are successful.
- Clear Patient Statements: Use simple, transparent billing to improve patient payments.
- Follow Up on Balances: Actively manage overdue accounts to reduce outstanding payments.
- Conduct Billing Audits: Regularly review processes to catch and fix errors before payers do.
- Monitor Metrics: Track KPIs like denial rates and Days in A/R to fine-tune your billing workflow.
Why it matters: U.S. practices lose $262 billion annually to claim denials, 60%-80% of which are preventable. By following these steps, you can reduce denials by up to 30% and maintain steady cash flow.
12-Step Medical Billing Checklist for Faster Payment Processing
How the Medical Billing Process Works | Step-by-Step Guide by RCM Matter

Step 1: Verify Patient Information at the Point of Service
Making sure patient information is accurate during check-in is a simple but critical step to avoid claim denials. Eligibility problems account for around 3% to 7% of all denied claims – issues that could have been caught during check-in. For a practice generating $50 million annually, just a 3% denial rate tied to eligibility could mean $1.5 million in delayed or at-risk revenue.
During check-in, confirm these key details:
- Subscriber’s full name and relationship to the policyholder
- Member ID, group number, and plan type (HMO, PPO, EPO, or Medicare Advantage)
- Effective and termination dates of coverage
- Provider tax ID and location
- Copay, deductible, coinsurance, and out-of-pocket status
- Administrative requirements like PCP selection, referrals, or prior authorizations for specific CPT codes
These steps ensure claims are submitted accurately and payments are processed faster.
"Eligibility and benefits verification is not a checkbox task. It is a core revenue cycle control that directly affects cash flow, denial volume, patient satisfaction, and staff workload." – Revenue Cycle Blog
For appointments, timing is key. Verify elective surgeries 5–7 days before, specialty visits 2–3 days before, and primary care visits 1 day in advance. For same-day or next-day appointments, confirm eligibility at the time of scheduling and again during check-in. Use automated 270/271 transactions for routine primary care, but stick to manual portal or phone verification for high-cost services like infusions or advanced imaging.
To streamline the process, implement a minimum data set checklist for intake. Use address validation tools and follow payer-specific formatting rules. Configure your scheduling software to flag issues like missing authorizations or invalid member IDs before finalizing appointments. This not only reduces errors but also keeps your revenue cycle running smoothly.
Step 2: Capture All Billable Services and Supplies
Missing out on billable services is one of the easiest ways for practices to lose money. Weak charge capture processes can drain between 1% and 3% of a healthcare provider’s net patient revenue every year. To put that into perspective, a practice with 100,000 visits annually could lose $150,000 in revenue if just 1 in 50 visits includes an unbilled $75 service. That’s a lot of money slipping through the cracks.
These missed charges often occur during handoffs between clinicians, front desk staff, and billers. A service might be documented by a provider but never make it into the billing system. The solution? Treat charge capture like a controlled workflow with multiple checkpoints.
"Missed charges are operational, not mysterious. A service can happen, documentation can exist, and yet the billable event never becomes a posted charge." – Billing Dynamix
The key to avoiding these oversights is systemization. A three-checkpoint process can help ensure no charges are left behind:
- End of each visit: Take 60–90 seconds to confirm the visit type, billable codes, units, and modifiers while the details are still fresh.
- End of each day: Reconcile your appointment schedule with the posted-charge queue to make sure every completed visit has a corresponding billing record.
- Pre-bill review: Before submitting claims, compare clinical notes with charge records to confirm that all documented services have been captured.
Another tip? Maintain a "frequently missed" list tailored to your clinic. This might include services like re-exams, imaging, therapy add-ons, or medical supplies – things that staff might overlook.
To make the process even smoother, use your EHR system to link procedure orders directly to charge sets. This way, when a provider signs off on documentation, the system automatically generates the corresponding charges. Automating this step reduces reliance on memory and manual entry, ensuring a more accurate and efficient billing process.
Step 3: Use Accurate Medical Coding
Mistakes in medical coding are a major culprit behind 32% of claim denials. These errors can significantly impact revenue, reducing collections by 3%–8%. Even a single miscoded diagnosis could lead to denied claims costing anywhere from $500 to $10,000. For a 50-provider specialty practice, just two coding errors per 100 claims could result in losses exceeding $100,000 annually. On a broader scale, the Medicare Fee-for-Service improper payment rate for Fiscal Year 2025 reached 6.55%, amounting to approximately $28.8 billion in improper payments.
"Remember: code what is documented and document what is coded." – Ayeesha Siddiqua, Lead Coder, RapidClaims
Accurate coding builds on solid data capture and is essential for avoiding claim denials. The most frequent coding errors typically fall into predictable categories. Upcoding – billing for a more complex service than was provided – can trigger audits and raise fraud concerns. On the flip side, downcoding – billing for a lower-level service to err on the side of caution – often results in chronic underpayment. Unbundling procedures that should be reported together can lead to rejections due to NCCI edits. Modifier misuse, especially with Modifier 25 (used for separate evaluation and management services) and Modifier 59 (for distinct procedural services), frequently causes automatic denials. Over-reliance on "unspecified" ICD-10 codes can also result in medical necessity denials.
So, how can you ensure accurate coding? Start by employing certified coders or encouraging your team to get certified. Certified coders (CPC, CCS) tend to have error rates that are 5% to 10% lower than non-certified staff. A peer review process can also make a big difference – having a second coder review 5–10% of claims before submission has been shown to cut denials by 20–30%. Staying updated on coding changes is equally important: ICD-10-CM updates every October 1st, CPT codes every January 1st, and HCPCS Level II codes are revised quarterly. Use billing software with built-in NCCI edits to catch bundling errors before claims are submitted. If the provider’s documentation is unclear, send a query using standardized templates to clarify before coding.
Step 4: Review Claims Before Submission
Once coding is accurate, take the time to thoroughly review claims before submission. Even perfectly coded claims can fail if basic data errors are present. A systematic review ensures that all details – like patient demographics, provider information, coding logic, and administrative fields – are correct. Ideally, a high-functioning billing department should aim for a first-pass clean claim rate between 92% and 95%.
A smart way to approach this is by using a multi-layer claim scrubbing process. This involves several steps:
- Start with core system edits, such as validating NPI numbers.
- Move on to clearinghouse checks for payer-specific EDI compliance.
- Finish with custom rules tailored to address historical denial patterns.
This process narrows down five key areas to focus on during the review:
- Patient demographics: Verify details like name, date of birth, and insurance ID.
- Provider information: Confirm the NPI and Tax Identification Number.
- Medical coding: Check that ICD-10, CPT, and HCPCS codes are current and accurate.
- Coding logic: Ensure proper diagnosis-to-procedure linkage and that required modifiers are included.
- Administrative requirements: Confirm prior authorization numbers and Place of Service codes.
"Payers do not pay claims that are late, incomplete, unsupported, or noncompliant." – Revenue Cycle Blog
This review step acts as a safety net, catching simple errors that could lead to avoidable denials. The goal should be for less than 5% of total denials to result from basic data mistakes, missing authorizations, or preventable coding errors. To address issues effectively, segment failed edits into specific workqueues based on error type, payer, or service line. This allows for quicker and more targeted resolutions. Additionally, if a recurring issue is identified, create a new edit rule to prevent it from happening again. Over time, this builds a stronger system of safeguards.
Timely submission is equally important. Aim to submit professional claims within 3 calendar days and institutional claims within 5 days. Running daily charge completeness reports helps reconcile scheduled visits with billed services, ensuring no revenue is overlooked. By combining thorough reviews with a consistent submission process, you set the stage for efficient follow-up and revenue reconciliation in the next steps.
Step 5: Submit Claims Quickly and Track Timelines
Once you’ve completed a thorough review of your claims, the next step is to submit them promptly and systematically. Timing is everything here – submitting clean claims quickly means faster payments. Industry benchmarks recommend submitting professional claims within 3 calendar days and institutional claims within 5 calendar days of the service date. These quick turnarounds not only improve cash flow but also help you meet payer filing deadlines, which can range from 90 to 180 days for commercial insurers.
To hit these benchmarks, establish firm internal deadlines for charge entry: aim to enter professional charges within 48 hours and facility charges within 72 hours of the service date. Once charges are entered and scrubbed, submit professional claims multiple times a day and facility claims daily. This steady flow prevents bottlenecks and ensures revenue keeps moving.
Avoid delaying clean claims while waiting for a few problematic ones. If 95% of your batch is ready, submit it right away. Handle outlier claims separately to avoid holding up payments for the majority.
Tracking submissions is just as important as speed. Configure your billing system to issue automated alerts when claims approach payer filing deadlines. These alerts can help you prioritize those claims and route them into a dedicated work queue. Additionally, use a clearinghouse that provides real-time or near real-time acknowledgments, such as 277CA reports, to identify and resolve rejections before they even reach the payer. Regularly reconcile these acknowledgment files with your billing system to ensure no claims are lost during transmission. This proactive approach minimizes errors and keeps your claims process running smoothly.
Step 6: Reconcile Payments and Fix Discrepancies
When payments come in, the real work of safeguarding your revenue begins. Accurate payment posting isn’t just about logging transactions – it requires a thorough financial review to catch underpayments early.
Start by matching each payment to its corresponding claim. Take a close look at the "Allowed Amount" listed on the remittance advice and compare it to your contracted rates. This "Allowed Amount" is your true guide to contract compliance, not just the final "Paid Amount." Pay special attention to Claim Adjustment Reason Codes (CARCs) and Remittance Advice Remark Codes (RARCs). These codes help you determine whether an adjustment is legitimate or if an underpayment is being misclassified as a "contractual adjustment." Identifying these discrepancies promptly ensures compliance with your contracts and helps prevent revenue loss.
"Payment posting is not just about recording money received. It is about interpreting payer behavior correctly and protecting every dollar that should have been collected." – Safwan Azeem, AMBCI
Underpayments are no small matter – they typically account for 1% to 3% of revenue. For a $2 million practice, that translates to $20,000–$60,000 in lost income.
To stay ahead, implement a weekly workflow that categorizes variances, like clinic errors, documentation issues, or payer disputes. Escalate discrepancies with high financial impact immediately. Automation tools can help you spot underpayment trends and reduce manual errors. Daily reconciliation is also key – ensure that posted transactions match your remittance and deposit totals so your ledger stays accurate and your cash flow remains steady.
As part of this process, verify that deductibles, copays, and coinsurance amounts are correctly aligned with the patient’s benefit plan before transferring any balance to patient billing. Missteps here can lead to collection challenges and erode patient trust. Regularly audit your Electronic Remittance Advice (ERA) mapping and document all discrepancies to uncover recurring issues that might require renegotiating payer contracts.
Step 7: Track and Analyze Claim Denials
After streamlining claim submissions, the next critical step is to track and analyze claim denials. This isn’t just about addressing individual issues – it’s about uncovering patterns that reveal deeper flaws in your billing process.
On average, medical practices experience denial rates ranging from 10% to 19%. What’s even more concerning? Around 65% of denied claims are never reworked or appealed, leaving significant revenue on the table. Yet, about 63% of these denials are recoverable if addressed properly and within the required timeframes.

The first step is to centralize your tracking efforts. Record every denied claim in one system, noting essential details like denial date, payer-specific codes, payer name, dollar amount, and service date. This structured documentation not only organizes your data but also helps identify recurring issues that can be fixed at their source. To make this process even more effective, standardize payer-specific reason codes into 15–25 internal categories based on departmental roles. For instance, eligibility issues can be assigned to registration, technical errors to coding, and medical necessity concerns to clinical teams. This approach transforms vague feedback into actionable insights.
"Working denials is necessary; preventing them is what changes the numbers." – PCH Health
Dive deeper into your denial data by analyzing it across multiple dimensions – payer, service location, provider, specialty, and department. This helps pinpoint where losses are concentrated. Additionally, track key metrics monthly, such as the First Pass Acceptance Rate (aim for 90–95%), Days in Accounts Receivable (A/R), and Net Denial Rate (the amount written off after appeals).
The ultimate goal is to create a feedback loop that drives improvements. Use your findings to update front-end processes, like refining registration protocols or enhancing EHR templates to catch missing details. Offer staff training tailored to recurring issues. To keep this momentum, consider forming a monthly denial council. This group, including leaders from billing, clinical, and registration departments, can review performance metrics and assign ownership for prevention strategies. By turning insights into action, you can make meaningful changes to your billing workflow.
Step 8: Create a Clear Appeals Process
Once you’ve analyzed claim denials, the next step is setting up an organized appeals process. This isn’t just about recovering lost revenue – it’s also a chance to pinpoint recurring issues and make improvements. And it’s worth the effort: while fewer than 1% of denied claims are typically appealed, over 50% of those appeals end up being successful.
Start by understanding the difference between rejections and denials. Rejections happen due to front-end errors – like typos or invalid patient IDs – and don’t even make it into the payer’s system. These should be corrected and resubmitted right away. Denials, on the other hand, are claims that have been processed and refused for clinical or policy reasons. Fixing these requires a formal appeal backed by the right documentation. Your appeal packet should include:
- The original claim
- The Explanation of Benefits (EOB) with the denial code clearly marked
- A cover letter addressing the reason for denial
- Supporting clinical documents, like operative notes, lab results, or proof of prior authorization
Timing is critical. Appeals need to be filed within 60 to 180 days of the denial to avoid losing revenue permanently. Use a follow-up system that reminds you to check in every 15–30 days for high-value claims. And keep detailed records of every interaction – note the date, the representative’s name, and the call reference number. This documentation creates a strong paper trail.
"When insurance says ‘no,’ that doesn’t mean the fight is over. In fact, it’s often just the beginning."
- Meredith Hirsh, MBA, FACMP, CEO and Co-Founder of The Hirsh Center
If your first appeal doesn’t work, don’t stop there. Escalate to a supervisor review, file a formal inquiry referencing prompt-pay deadlines, or request an external review. These steps can overturn 40%–70% of denials. Additionally, new CMS rules for 2026 will limit Medicare Advantage plans from reopening previously approved inpatient admissions, giving you extra leverage to challenge retro-denials.
The ultimate goal? Turn your 63% recoverable denial rate into actual revenue. A well-structured appeals process, combined with persistent follow-up, ensures you’re not leaving money on the table.
Step 9: Send Clear Patient Statements
After handling appeals, the next priority is ensuring patients understand their financial responsibilities. Clear, straightforward statements not only speed up payments but also foster trust. With nearly 90% of Americans advocating for healthcare price transparency and roughly 23 million people burdened by medical debt, clarity in billing is more important than ever. Confusing statements can delay payments, frustrate patients, and flood your office with avoidable calls.
To make your statements effective, include these essential components:
- Header Information: Clearly display your practice name, logo, contact details, and the statement date.
- Patient Details: Include the patient’s full name, date of birth, and account number.
- Account Summary: Provide a breakdown of the previous balance, new charges, payments, adjustments, and the current balance.
- Itemized Services: List service dates, clear descriptions (not just codes), CPT codes, and individual charges.
- Insurance Activity: Show what the insurer paid, contractual adjustments, and any remaining balance.
- Aging Breakdown: Include a timeline of how long the balance has been outstanding (e.g., 0–30, 31–60, 61–90, and 90+ days).
"Good statement design should be all about simplicity: informing the patient exactly what they owe and emphasizing the channels they can use to make a payment." – Brian Watson, Elite Payment Solutions
To enhance readability, write in plain language at a sixth-grade level. Use short sentences and avoid unnecessary jargon. Employ bold headlines, active voice, and plenty of white space to guide the reader’s eye. Payment instructions should stand out – clearly outline accepted payment methods, provide links to online portals, highlight the due date, and consider offering payment plans for larger balances.
For example, Avita Health reported a 169% increase in point-of-service collections in February 2026 by improving their billing process.

The method of delivery also matters. While some patients prefer paper statements, about 30% favor paying via text message. Offering multiple options – like secure email, patient portals, text-to-pay links, and traditional mail – ensures patients can choose what works best for them. Sending statements on a regular schedule and following up with weekly reminders for overdue balances can further streamline collections. By prioritizing clarity and consistency, you can reduce confusion, improve patient satisfaction, and keep the revenue cycle running smoothly.
Step 10: Follow Up on Overdue Patient Balances
Sending clear billing statements is essential, but without active follow-up, payments can slip through the cracks. Healthcare providers risk losing between $120,000 and $300,000 annually simply due to missed follow-ups. Staying on top of overdue balances can make all the difference.
Aging buckets are a great way to structure your follow-up process. Divide accounts into time frames like 0–30, 31–60, 61–90, and 90+ days, and increase the urgency of your efforts as balances age. Practices that stay disciplined in managing accounts receivable (AR) collect 9% more revenue within the first 30 days compared to those without a structured approach. To stay ahead, conduct weekly AR reviews and prioritize high-value accounts by sorting aging buckets by dollar amount. This kind of structured strategy bridges the gap between sending bills and actually collecting payments.
"The most common AR mistake providers make is waiting too long to check a claim. Once a claim crosses thirty days without action, the odds of a delay or denial increase sharply." – Andrew Christian, Billing Manager, MedSole RCM
Tailor your follow-up strategy based on how old the balance is. For balances in the 0–30 day range, confirm that statements were sent and received on time. Between 31–60 days, step things up with phone calls or automated reminders, and consider offering payment plans. When accounts hit the 61–90 day mark, increase your contact efforts and escalate the case to a supervisor if needed. For balances older than 90 days, daily follow-ups and a final notice should precede referral to external collections.
To maintain financial health, aim to keep at least 95% of your accounts receivable within a 120-day window. Ideally, no more than 10–15% of accounts should be over 90 days old.
Finally, document every interaction thoroughly. Record details like the date, time, representative involved, and a summary of the conversation. This creates a reliable paper trail for future reference. Use payer portals in the first 7–14 days to verify patient responsibility codes. Top-performing departments manage to keep their Days in AR under 35.
Step 11: Conduct Regular Billing Audits
Even with strong systems in place, billing errors can sneak through, causing payment delays. Regular audits help catch these mistakes before payers do, leading to smoother claims and faster revenue collection. In fact, U.S. doctors lose an estimated $125 billion annually due to inefficient billing practices, with medical claim denial rates hovering around 12%.
The Office of Inspector General (OIG) advises conducting annual audits to uncover risks in billing, coding, and documentation. However, combining quarterly internal audits for high-risk areas with annual external audits provides a more thorough approach to maintaining compliance.
"Medical billing audits secure your revenue before payers come after you." – MedCloudMD
To get the most out of your audits, focus on areas with the highest impact. Start by reviewing documentation completeness – provider notes should be signed, dated, and clearly justify the medical necessity of each billed service. Check for coding accuracy by ensuring CPT, ICD-10, and HCPCS codes align with the documented services. Mistakes like upcoding or undercoding can cost practices between 1% and 5% of their revenue annually. Pay close attention to modifier usage, especially for modifiers 25 and 59, confirming they meet payer guidelines. Additionally, verify that billed E/M levels match the documented medical decision-making or time spent, and ensure adherence to CMS rules, prior authorizations, and filing deadlines.
Recovery Audit Contractors recovered $474 million in a single fiscal year, and CMS is now leveraging advanced data analytics to detect unusual billing patterns – even in smaller clinics. By acting on audit findings, practices can typically achieve a 5% to 15% revenue boost. Use the insights gained from audits to develop targeted staff training and refine your processes. These improvements will enhance your overall billing workflow as you move into the final step of monitoring and adjusting billing practices.
Step 12: Monitor and Adjust Billing Processes
After conducting regular audits, the next step is to keep a close eye on your billing processes and adjust them as needed. Practices that continuously track performance metrics and adapt based on data can recover 20% to 30% more revenue compared to those that don’t. Even the most efficient billing systems can slip back into inefficiency without consistent monitoring.
"What gets measured gets managed. Healthcare practices that track revenue cycle management (RCM) KPIs consistently outperform those that don’t, often by 20-30% in revenue recovery." – Healix RCM Editorial Team
Focus on key metrics that directly affect cash flow. For example:
- Days in Accounts Receivable (A/R): Aim for less than 35 days. The industry standard ranges from 32 to 40 days, but keeping it under 45 days is critical for financial stability.
- Clean Claim Rate: This should be 95% or higher.
- Denial Rate: Keep this below 5% to 8%.
- Net Collection Rate: A healthy range is between 95% and 99% for well-managed practices.
These metrics are like early warning systems. They help you identify revenue leaks and guide where to focus your improvements. Make it a habit to review these KPIs monthly or quarterly to catch trends early. For instance, if your denial rate starts creeping up, break it down by reason – whether it’s missing authorizations, coding errors, or eligibility issues – and assign the responsibility to the appropriate team. Eligibility rejections should go to patient access teams, while coding errors need the attention of your coding staff.
Use the insights you gather to make specific changes. If your Billing Lag – the time from service to claim submission – exceeds 48 hours, consider implementing a same-day charge entry process. If certain modifiers are causing frequent denials, update your claim scrubbing software to catch those issues before submission. The best practices treat their claim scrubbing systems as dynamic tools. Every time a new denial pattern surfaces, they create an automated rule to prevent it from happening again.
Adopt a two-pronged strategy: either "edit" by enhancing software to block errors, or "educate" by providing staff with targeted training to improve decision-making. This constant cycle of monitoring, learning, and adapting keeps your billing processes efficient and your revenue cycle running smoothly.
Conclusion: Faster Payments Through Better Billing Practices
Following these 12 steps streamlines medical billing and ensures steady revenue flow. Each step enhances claim accuracy, enabling practices to achieve first-pass clean claim rates of 95% or higher.
The financial benefits are clear. By implementing these steps, practices can reduce denials by up to 30% and maintain clean claim rates of 95% or more, which significantly speeds up cash flow. Practices that keep Days in A/R under 35 days and net collection rates at 96% or above can sustain stable cash flow and secure the working capital necessary for daily operations.
With payers now leveraging AI to issue near-instant "millisecond denials" based on pattern recognition, and appeal windows shrinking to just 60 to 90 days in many cases, staying ahead is more critical than ever. This checklist prepares you to tackle challenges like AI-driven denials and new CMS requirements, such as the 2026 CMS-0057-F rule mandating payers to provide detailed denial rationales.
"If you do not define success, your team will default to ‘claims went out,’ not ‘cash came in quickly and correctly.’" – Revenue Cycle Blog
FAQs
Which billing metrics should I track first?
To improve cash flow and revenue recovery, begin by monitoring key metrics that offer insight into your financial processes. Pay close attention to:
- Days in accounts receivable (AR): This measures how quickly payments are collected.
- Clean claim rate: Tracks the percentage of claims submitted without errors.
- Denial rate: Highlights the frequency of claim rejections.
- Collection percentage: Reflects how much of the billed amount is successfully collected.
These metrics help pinpoint payment delays, claim issues, and inefficiencies in collections. By keeping an eye on these indicators, you can identify areas for improvement, reduce errors, and prioritize actions to accelerate payments.
What’s the best way to prioritize denial work?
The most effective approach to managing denial work is by following a structured process that pinpoints, evaluates, and resolves denials promptly. Start by grouping denials based on their root causes, and target the most common or high-impact ones first – this can make a significant difference in improving cash flow. Consistent follow-ups and well-designed workflows for urgent or high-value denials are also key to avoiding backlogs and keeping revenue cycle management running smoothly.
How can I speed up patient payments without more calls?
If you’re looking to speed up patient payments without making additional calls, the key lies in refining your revenue cycle management (RCM). Here’s how:
- Verify Eligibility and Benefits Upfront: Confirm patient insurance details before their appointments. This helps avoid claim denials down the line, saving time and frustration for everyone involved.
- Leverage Automation Tools: Automation can make billing processes smoother, cut down on manual mistakes, and ensure claims are more accurate.
- Focus on Error-Free Submissions: Submitting complete and accurate claims right from the start reduces delays and denials, helping payments arrive faster without the need for extra follow-ups.
By prioritizing these steps, you can streamline your payment process while keeping outreach efforts manageable.